![HOW TO INSTALL A 4-POINT LOCK AND RODS [VIDEO INCLUDED]](https://parkwooddoors.com.au/wp-content/uploads/2020/08/Untitled-7.jpeg)
HOW TO INSTALL A 4-POINT LOCK AND RODS [VIDEO INCLUDED]
This is a generic step-by-step guide of how to insert a 4-point lock into a Strata TGV design. The door has already been machined for the lock, and the top and bottom bars have been machined for the rod hole.
View the largest range of aluminium feature entrance door here
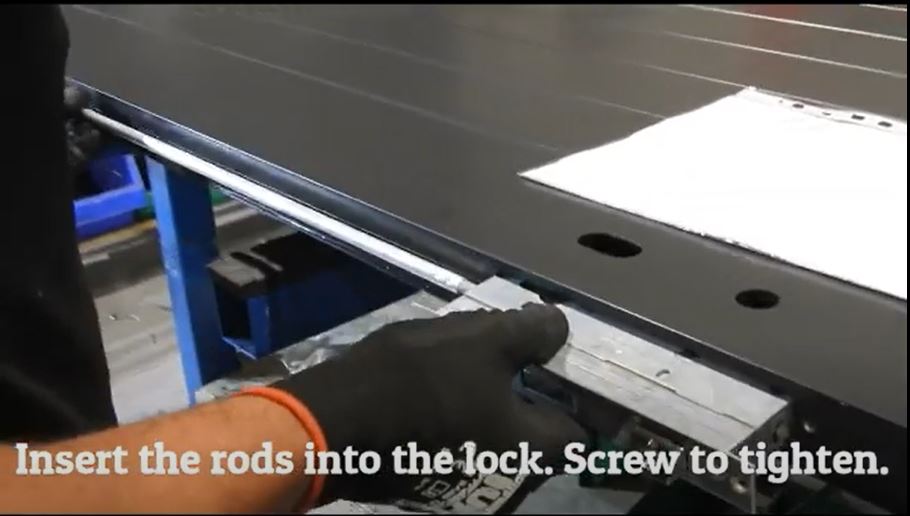
- Insert the rods into the lock and sit on the top or side of the stile, lining up the spindle and cylinder with the machining on the stile face. Make sure the rod extenders are in the closed position (the thread housing is flush with the lock body). EXPERT TIP: We always favour performing this step to the side of the stile, to eliminate any chance of scratching the door.

2. Using the black plastic D-tips, mark the innermost point of the D-tips on the rod so that when it is inserted hard into the rod the extreme of the full-width part of the D-tip will be flush with the capping exterior once the plastic end caps are installed on the top and bottom bars.
Also measure from the bottom of the D-tip section to the hollow in the inserted point of the plastic. This will be where the rod will be crimped in from the end of both of the rods.

3. To assist with the procedure, the D-tip in the picture has been marked as follows:
A Flush with exterior of capping (top and bottom)
B Cut the rod to this length
C Crimp point
D Insert gold pin here (refer below)

4. Remove the rods from the lock body and cut both rods to length.

5. Place a small amount of glue into the end of the rods.
Insert the gold pins into the D-tips and insert the D-tips into the rods.

6. While the lock body is outside of the stile, perform a “dry run” to make sure the length of the rods is correct. Once confirmed, crimp the rods to keep the D-tips in place.
EXPERT TIP: It is important to make sure the crimping is tight so that the plastic D-tips don’t turn independently of the rods. This is important when completing the final adjustments to the length of the rods, once they are attached to the lock body inside the stile.

7. Remove the rods, and install the lock in the stile with the screws provided.

8. Turn the spindle of the lock to engage the 4-point feature, leaving the rod housing extended from the lock body.

9. Feed the rods through the holes in the top and bottom capping through the machined channel until you feel them butt up to the rod housing. Turn to tighten within the housing. This step can be awkward; persist until complete.
EXPERT TIP: Remember that the flat section of the D-tip faces the lock side edge of the door.

10. Once screwed in, disengage the rod extender housing to confirm the D-tips are visible the correct length from the top and bottom housing. If final adjustments are necessary, complete them at this stage.

11. Place the plastic end caps into position and screw them into place.
EXPERT TIP: Even when using self-tapping screws, it is always advisable to pre-drill the holes. We used a 3mm drill bit.

This guide was prepared in March 2019 by the Afternoon Shift (Aluminium Division) at Parkwood Doors.

View the largest range of aluminium feature entrance door here
Watch the video: